

How To Recover Computer To Factory Settings Windows 7
Z7_3054ICK0KGTE30AQO5O3KA30N0
hp-concentra-wrapper-portlet
![]() Deportment
Deportment
HP PCs - Performing an HP Arrangement Recovery (Windows vii)
This certificate is for HP and Compaq computers that came with Windows 7 installed.
This document explains how to reset the computer to its original factory shipped country and is divided into sections based on the different ways of performing a system recovery.
Support all personal files and read all caution statements earlier performing a organization recovery.
The complete recovery procedure can take four to six hours or more to complete. For best results, the reckoner should be connected to the Internet. The computer restarts several times during the process. Practise not turn off the power or interrupt the recovery process until the prompt to log in to Windows displays.

Types of organisation recovery
Your computer might have three types of System Recovery available, or it might have simply two. Employ the recovery type that resolves your issue without making more than changes than necessary.
-
System Recovery: This pick reformats the organisation drive (usually C:), reinstalls the original operating organisation, and reinstalls all the original hardware drivers and software. System Recovery does not impact user created partitions. If at that place are two difficult drives, System Recovery modifies simply the drive with the operating system.
caution:
If the size of the operating system sectionalization (usually C:) was reduced below a minimum size requirement, other user created partitions are removed and stored data is destroyed.
-
Factory Reset: Factory Reset removes all partitions, reformats the entire hard drive, reinstalls the original operating organization, and reinstalls all the original hardware drivers and software. This option also recreates the required Recovery segmentation (ordinarily D:) and UEFI sectionalization (usually E:) and reinstalls the required software.
The Factory Reset option returns all of the notebook's software to the condition it was in at the fourth dimension of purchase. All user changes or additions are removed.
-
Minimized Image Recovery: Bachelor on many of HP's notebook computers, the Minimized Prototype Recovery removes all partitions, reformats the entire hard drive, reinstalls the original operating system and hardware drivers, and reinstalls HP essential software (such equally HP Back up Assistant and HP Recovery Manager). Minimized Image Recovery does non reinstall the trial applications and games.
Recovery from the Windows 7 desktop screen
If Windows 7 opens correctly, perform the following steps to get-go a system recovery from the Windows 7 start menu.
-
Turn off the calculator.
-
Disconnect all peripheral devices, except for the monitor, keyboard, mouse, and ability cord. Remove media from internal drives, and remove any recently added internal hardware.
-
Turn on the calculator.
-
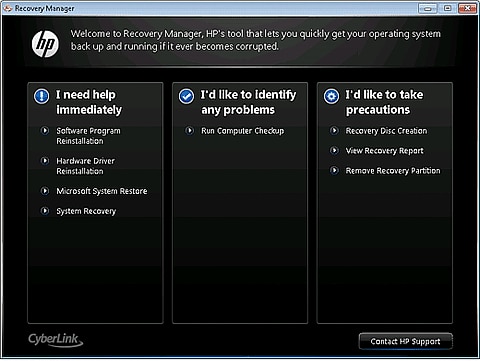
Click Kickoff
 , click All Programs, click Recovery Manager, and then click Recovery Manager over again.
If yous are prompted for an Administrator password or confirmation, type the password or provide confirmation. If a User Business relationship Control window asks if you want to allow the program to make changes to the reckoner, click Yes.
-
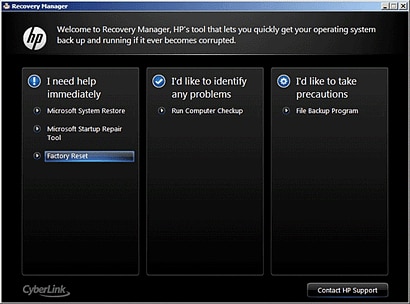
Under I need aid immediately, click Organisation Recovery.
-
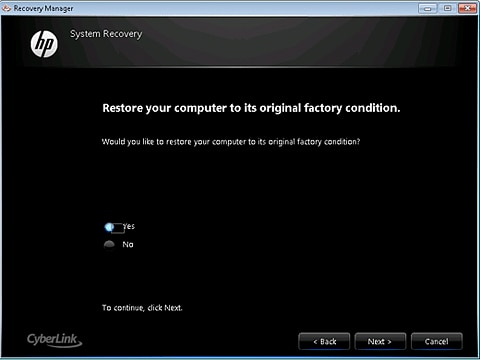
The Recovery Director asks if you lot want to restore the computer to its original manufacturing plant shipped condition. Click Yes, so click Next.
-
The calculator restarts. If the recovery partition on the difficult disk bulldoze is functioning correctly, the Recovery Managing director window displays.
note:
If the recovery partition on the hd is not functioning correctly, a set of recovery discs is needed to run a system recovery. Follow the instructions listed in the section Recovery from recovery discs.
-
Click System Recovery.
-
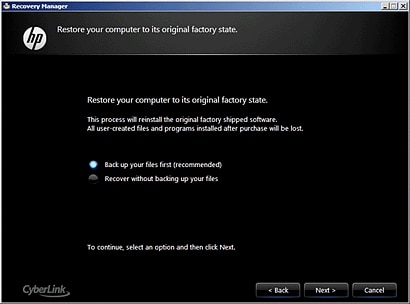
When System Recovery prompts yous to back up your files, select a backup option:
-
If yous accept already backed up personal files or you practise non desire to dorsum up personal files, select Recover without backing up your files, so click Next. Continue to the side by side step.
-
If you want to back up your personal files, follow these steps to create a fill-in.
-
Select Support your files beginning (recommended), and so click Next.
-
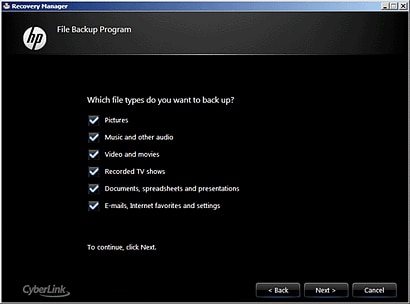
Select the file types to back up, then click Next.
-
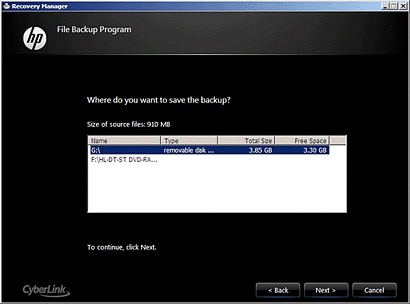
Recovery Manager scans the figurer for storage devices. Select the storage device to save the backup, and then click Next.
annotation:
If you selected a CD or DVD bulldoze, the reckoner prompts you to insert a blank disc.
-
When Recovery Manager is finished backing up files, remove the fill-in disc or storage device, and then click Next to continue with the recovery process.
notation:
If the fill-in procedure fails, make sure the chapters of the storage device is large enough to store the files, or try de-selecting some file types to reduce the amount of files that are copied. Other reasons for failed backups might exist caused by file corruption. In some cases, it might not be possible to save files using this backup method.
-
-
-
Click OK in the warning that displays.
-
Afterward the organisation recovery is consummate, click Finish to restart the computer. Complete the setup screens and wait until the computer finishes the setup.
-
Once the setup is complete, turn off the reckoner, reconnect all devices and cables, and then plough on the computer.
-
Before using the computer, update and protect your computer. Reinstall any virus and security software that was installed before the arrangement recovery.
-
Reinstall any software programs that were added after purchasing the computer, as well every bit whatsoever files that were backed up.
Recovery from the startup screen (during system boot) OR when unable to boot to login in screen
If Windows 7 does non open up correctly, perform the following steps to recover the computer:
note:If the recovery division on the hd is not operation correctly, this method does non piece of work and an error bulletin displays. If an fault bulletin indicates that Arrangement Recovery cannot exist run from the startup screen, a ready of recovery discs is needed to perform a system recovery. Follow the instructions listed in the department Recovery from recovery discs.
-
Plough off the computer.
-
Disconnect all peripheral devices, except for the monitor, keyboard, mouse, and power cord. Remove media from internal drives, and remove any recently added internal hardware.
-
Turn on the computer and repeatedly printing the F11 cardinal, well-nigh in one case every 2d, until Recovery Manager opens.

-
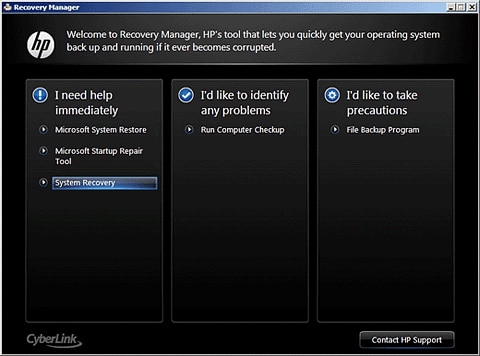
Nether I need assistance immediately, click System Recovery.
-
When System Recovery prompts y'all to dorsum up your files, select a backup option:
-
If you take already backed up personal files or you practise not want to back up personal files, select Recover without backing up your files, and then click Side by side. Go along to the next footstep.
-
If you desire to support your personal files, follow these steps to create a backup.
-
Select Back upward your files starting time (recommended), and then click Next.
-
Select the file types to back up, and and then click Next.
-
Recovery Manager scans the computer for storage devices. Select the storage device to save the backup, and and then click Next.
note:
If y'all selected a CD or DVD drive, the computer prompts you to insert a blank disc.
-
When Recovery Manager is finished backing up files, remove the backup disc or storage device, and and so click Next to continue with the recovery process.
notation:
If the backup procedure fails, make sure the capacity of the storage device is large plenty to store the files, or effort de-selecting some file types to reduce the corporeality of files that are copied. Other reasons for failed backups might be caused by file corruption. In some cases, it might not be possible to salve files using this backup method.
-
-
-
Click OK in the warning that displays.
-
Afterwards the system recovery is complete, click Finish to restart the figurer. Complete the setup screens and await until the computer finishes the setup.
-
In one case the setup is consummate, turn off the computer, reconnect all devices and cables, and then turn on the computer.
-
Before using the calculator, update and protect your computer. Reinstall any virus and security software that was installed before the system recovery.
-
Reinstall any software programs that were added afterwards purchasing the computer, as well as whatever files that were backed upwardly.
Recovery from recovery discs
Perform the following steps to recover the computer using a set of recovery discs (either CDs or DVDs). These discs can exist a set that was received from HP Support or discs that you created.
notation:HP does not include recovery discs in the box its personal computers as the recovery software comes on the hard drive. You lot can obtain recovery discs from HP Support, or utilize Recovery Manager software to create a set of recovery discs yourself. HP recommends creating a fix of recovery discs when you receive your computer and storing them in a rubber place. Support Sent Recovery Discs can take as long as 4 to 6 hours to complete system recovery, but recovery discs that you create often take less time to complete system recovery. For more information about creating a set up of recovery discs, run across Creating Recovery Discs or Saving a Recovery Image to a USB Flash Drive in Windows 7.
-
Plough on the computer, and then insert the first recovery disc into the drive.
-
Press and hold the ability push button to turn off the computer.
-
Disconnect all peripheral devices, except for the monitor, keyboard, mouse, and power cord. Remove media from internal drives, and then remove whatsoever recently added internal hardware.
-
Plow on the computer.
-
Immediately press the Escape primal repeatedly, about in one case every second, until a Startup Menu or Select kick device carte opens.
-
The selections you need to brand vary slightly depending on the type of menu that displays on your screen:
-
If a Select Kick Device card displays, use the upward or downwardly arrow key to select the CD/DVD bulldoze, and then printing Enter to keep.
-
If a Startup Carte opens, press F9 to open "Boot Menu" or "Kicking Device Options". Use the up or downwards pointer key to select the CD/DVD drive. Then press Enter.
annotation:
More than one CD/DVD drive selection might exist available from the list of bootable devices. If so, select i of the CD/DVD selections from the list to see if HP Recovery starts. If recovery does not start or a non-organization deejay error displays, restart the estimator past pressing the power button and then repeat these steps to select some other CD/DVD drive. When recovery starts, go along using the steps to complete recovery.
-
-
A window might display and prompt yous to choose whether to run Recovery Manager from the hard disk drive or from the disc inserted. If this window displays, select the Run program from disc, and and so click Next.
-
Select an option based on the type of recovery discs you lot have:
-
Recovery discs created from your reckoner:
Click Factory Reset under I need assistance immediately. If the next screen prompts yous to confirm your option, select Yes and so click Side by side. If no confirmation screen displays, proceed with the next step.
-
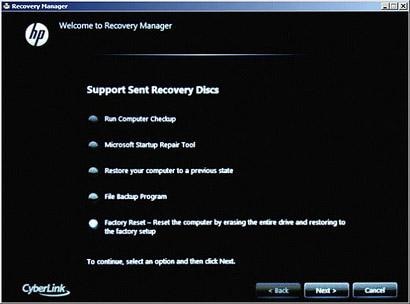
Recovery discs received from HP support:
Select one of the post-obit selections, depending on which choice is shown on your screen, and and then click Side by side.
-
Mill Reset - Reset the computer by erasing the unabridged bulldoze and restoring to the factory setup
-
Reset the reckoner by erasing the entire drive and restoring to the factory setup
-
-
-
When Organization Recovery prompts you to support your files, select a backup pick:
-
If you accept already backed upward personal files or you do not desire to dorsum up personal files, select Recover without backing upwards your files, and so click Next. Continue to the side by side step.
-
If you desire to support your personal files, follow these steps to create a backup.
-
Select Back up your files beginning (recommended), and then click Next.
-
Select the file types to back up, and then click Next.
-
Recovery Managing director scans the computer for storage devices. Select the storage device to salve the fill-in, and and so click Next.
note:
If y'all selected a CD or DVD drive, the computer prompts you to insert a bare disc.
-
When Recovery Manager is finished backing upwards files, remove the backup disc or storage device, and then click Side by side to continue with the recovery process.
notation:
If the backup procedure fails, make sure the capacity of the storage device is big enough to shop the files, or try de-selecting some file types to reduce the amount of files that are copied. Other reasons for failed backups might be caused by file corruption. In some cases, it might not be possible to save files using this backup method.
-
-
-
Click OK in the alarm that displays.
-
Read and respond to the screens as they brandish. If a screen prompts for a disc, insert the next disc. In some cases, you might have to repeatedly insert the same disc several times before the screen allows y'all to continue.
-
Subsequently system recovery is complete, remove the disc. If the tray does non squirt the disc, press the eject button on the PC instance to squirt the disc.
-
If you lot are presented with a "Restoration complete" screen, click Cease.
If you are presented with a "File copy is complete" screen, click Next.
-
Depending on which model of computer you have, the estimator either turns off or restarts. If the computer shuts off, expect 5 seconds and turn on the computer.
annotation:
If yous are using Support Sent Recovery discs sent from HP, information technology tin can take more than than an hour to complete the recovery process. Do non interrupt the recovery process. The recovery procedure is complete when the Windows Setup screens appear.
-
Complete Windows setup when the screens announced.
-
Once Windows setup has been completed, turn off the computer, reconnect all devices and cables, so turn on the computer.
-
Earlier using the computer, update and protect your calculator. Reinstall whatsoever virus and security software that was installed before the organization recovery.
-
Reinstall any software programs that were added after purchasing the estimator, as well as whatsoever files that were backed upwardly.
Boot from USB recovery drive
Perform the post-obit steps to recover the estimator using a USB flash bulldoze.
-
Turn on the computer, and insert the USB wink bulldoze into a USB port.
-
Turn off the computer by pressing and holding the power push button.
-
Disconnect all peripheral devices, except for the monitor, keyboard, mouse, and power cord. Remove media from internal drives, and remove any recently added internal hardware.
-
Immediately press the Escape key repeatedly, almost once every 2d, until a Startup or Select Kicking Device Carte opens.
-
The selections you lot need to make vary slightly depending on the blazon of menu that displays on your screen:
-
If a "Select Boot Device" menu displays, use the up or down arrow fundamental to select your USB Storage Device, and printing Enter to continue.
-
If a "Startup Carte" opens, press F9 to open the "Boot Menu" or "Boot Device Options". Utilise the up or downwards arrow key to select the name of your USB Storage Device (the volume characterization of the drive). Then press Enter to continue.

-
-
A window might display and prompt you to cull whether to run Recovery Manager from the hard disk or from the media inserted. If this window displays, select the USB flash drive choice, and then click Next.
-
Click Arrangement Recovery nether I demand help immediately. On the next screen, select Aye to ostend that yous want to restore your computer to its original mill condition, and and then click Adjacent to continue.

-
When System Recovery prompts you to back up your files, select a backup option:
-
If yous have already backed upward personal files or you do non want to back upwards personal files, select Recover without backing upwardly your files, and and then click Next. Go on to the next step.
-
If you want to dorsum up your personal files, follow these steps to create a backup.
-
Select Back up your files offset (recommended), and and then click Adjacent.
-
Select the file types to support, so click Side by side.
-
Recovery Manager scans the calculator for storage devices. Select the storage device to relieve the backup, and then click Next.
-
When Recovery Manager is finished bankroll up files, remove the fill-in disc or storage device, and then click Next to keep with the recovery process.
note:
If the fill-in procedure fails, make sure the capacity of the storage device is large enough to store the files, or try de-selecting some file types to reduce the amount of files that are copied. Other reasons for failed backups might be caused past file corruption. In some cases, it might not be possible to save files using this backup method.
-
-
-
Click Next. A message displays warning you that all devices should exist disconnected from the PC. Be sure all devices, except the recovery wink drive, are asunder, and so click OK.
-
Read and respond to the screens as they appear. Afterward organisation recovery is complete, a "Restoration complete" screen displays.
-
Remove the USB flash drive from the USB port.
-
Click Finish to restart your estimator.
-
Depending on the model of your computer, the computer either turns off or restarts. If the calculator turns off, wait v seconds, and then plow on the calculator.
-
Complete Windows setup when the screens announced.
-
Once Windows setup has been completed, turn off the calculator, reconnect all devices and cables, and then plough on the computer.
-
Before using the estimator, update and protect your computer. Reinstall any virus and security software that was installed earlier the system recovery.
-
Reinstall any software programs that were added afterwards purchasing the reckoner, as well as any files that were backed up.
Source: https://support.hp.com/us-en/document/c01867418
Posted by: jonesmopine.blogspot.com
0 Response to "How To Recover Computer To Factory Settings Windows 7"
Post a Comment